Architectural Photography
Buildings and portraits became popular subjects for
photography because the long exposure times required by the early
photographic processes made it impractical to photograph moving
objects. As the technology improved, and people’s desire to
learn about their surroundings increased in the Victorian Era,
photographers were dispatched to all four corners of the globe to
record events, buildings and geographical features. As
photography advanced, so new genres and uses were developed for
it and architectural photography became a field in its own right.
In this article, I intend to analyse the various uses and
techniques of architectural photography.
 Today,
the most common type of architectural photography are the images
taken by estate agents to sell houses. For most houses, the
images will typically be of the front of the property with the
most flattering aspect. These images are normally taken by the
estate agents rather than by a professional photographer and
digital camera technology will be used almost exclusively. The
digital cameras save time and money by producing digital images
which can be fed straight into the typesetting software for
producing the advertisement. Looking through the property page of
a local newspaper, the artistic quality and skill of the
photography is generally appalling with images being squint,
taken from the wrong angle, exposure problems, poorly framed,
poorly focused and unattractive. But this misses the point. We
don’t expect works of art on this kind of advertising
photography and we use the picture as a rough guide to the
property. The other extreme can be seen in the up market world of
"Country Life" and other similar magazines. The adverts
in these magazines are almost works of art in their own right.
Being detailed studies of the buildings, including the interiors
in many instances. The image sells the property in this case and
so much more care is required. A skilled photographer using
medium and large format cameras is therefore essential.
Today,
the most common type of architectural photography are the images
taken by estate agents to sell houses. For most houses, the
images will typically be of the front of the property with the
most flattering aspect. These images are normally taken by the
estate agents rather than by a professional photographer and
digital camera technology will be used almost exclusively. The
digital cameras save time and money by producing digital images
which can be fed straight into the typesetting software for
producing the advertisement. Looking through the property page of
a local newspaper, the artistic quality and skill of the
photography is generally appalling with images being squint,
taken from the wrong angle, exposure problems, poorly framed,
poorly focused and unattractive. But this misses the point. We
don’t expect works of art on this kind of advertising
photography and we use the picture as a rough guide to the
property. The other extreme can be seen in the up market world of
"Country Life" and other similar magazines. The adverts
in these magazines are almost works of art in their own right.
Being detailed studies of the buildings, including the interiors
in many instances. The image sells the property in this case and
so much more care is required. A skilled photographer using
medium and large format cameras is therefore essential.

 Apart from selling property, photography is
used to sell design concepts and architects services.
Professional magazines like "The Architects Journal"
contain many images in every issue detailing the workings and
styling of various projects. Architectural firms use images from
their more innovative buildings to advertise their services and
so, again, good quality photographs are required. This kind of
photography can be a lot more complex as the buildings tend to be
large commercial sites, built in a city landscape where they are
surrounded by other buildings, lighting is complex and there is
little room to manoeuvre around the property. The interior of the
building is generally more important than the exterior and this
generates its own set of problems. The light levels are generally
to low and the fluorescent lighting will normally produce a
colour cast if care is not taken. The photographer has to be
skilled at using lights to create an effect.
Apart from selling property, photography is
used to sell design concepts and architects services.
Professional magazines like "The Architects Journal"
contain many images in every issue detailing the workings and
styling of various projects. Architectural firms use images from
their more innovative buildings to advertise their services and
so, again, good quality photographs are required. This kind of
photography can be a lot more complex as the buildings tend to be
large commercial sites, built in a city landscape where they are
surrounded by other buildings, lighting is complex and there is
little room to manoeuvre around the property. The interior of the
building is generally more important than the exterior and this
generates its own set of problems. The light levels are generally
to low and the fluorescent lighting will normally produce a
colour cast if care is not taken. The photographer has to be
skilled at using lights to create an effect.
 The
skills of the architectural photographer are often called upon
during the building progress to record the various stages. This
is especially true of prestigious projects like the millennium
dome where there is a lot of public interest. Apart from their
use as a historical record, these photographs are typically used
to publicise the building, the building contractors and or a
specific material or process used in the building’s
construction.
The
skills of the architectural photographer are often called upon
during the building progress to record the various stages. This
is especially true of prestigious projects like the millennium
dome where there is a lot of public interest. Apart from their
use as a historical record, these photographs are typically used
to publicise the building, the building contractors and or a
specific material or process used in the building’s
construction.
The design and planning of buildings is a long and convoluted
process which typically starts with a vague request from a client
and a site survey. Photography is often used in the initial
stages to give the architects a feel for the location of the new
building. The brief for the photographer would be to not only
record the site but to photograph the surrounding buildings and
landmarks. The model makers, who would make a mock-up of the
street with the new building so that the client can see what the
final result will be like, also use these images to ensure
accuracy. Often these models themselves become the subject for
the architectural photographer as the images are required for
planning applications, brochures and leaflets.
The photography of buildings is also used to form a historical
record for reference in the future. The Royal Commission on the
Historical Monuments of England which includes the National
Monument Record and the National Building Record is a national
archive of information about historic and listed buildings, which
includes photographs in its collection. Survey teams are sent
across the country to record all types of buildings from sheds to
factories. A record is made of the interior and exterior of the
building, the materials used in its construction, and any
peculiar architectural practices. Study is also made of the use
of the building and this is especially important when recording
industry and old industrial processes.
Whereas architectural photography is mainly concerned with
portraying an image and selling a product, record photography is
concerned with portraying facts. Every image must convey as much
factual information about the subject as possible pushing
artistry from the main focus to a minor priority. The techniques
and problems faced by the photographer, however, are the same in
both cases.
 The
toolkit for a true Architectural Photographer is extensive and
will vary depending on what kind of shot is required by the
client. In order to get the flexibility and quality, a field or
technical camera is typically used. These cameras are very simple
devices consisting of a plate to hold the negative, a plate to
hold the lens/shutter mechanism and a flexible bellows between
them. The lens can be moved in any direction relative to the film
plane and this one feature gives this camera its versatility and
strength. The different movements essentially improve control
over depth of field and distortions caused by wide-angle lenses
and awkward camera angles. The most commonly used feature of
these cameras is the "rising front", which raises the
height of the lens relative to the film plane, and corrects the
distortion commonly known as converging verticals. Other
movements can be used to correct or create distortions to provide
a dramatic effect. Medium format or 35mm cameras can be used,
however, the smaller negatives and lack of control outweighs the
size and cost benefits of these formats. Shift lenses are
available for these formats although they only produce a limited
amount of movement and tend to be very expensive.
The
toolkit for a true Architectural Photographer is extensive and
will vary depending on what kind of shot is required by the
client. In order to get the flexibility and quality, a field or
technical camera is typically used. These cameras are very simple
devices consisting of a plate to hold the negative, a plate to
hold the lens/shutter mechanism and a flexible bellows between
them. The lens can be moved in any direction relative to the film
plane and this one feature gives this camera its versatility and
strength. The different movements essentially improve control
over depth of field and distortions caused by wide-angle lenses
and awkward camera angles. The most commonly used feature of
these cameras is the "rising front", which raises the
height of the lens relative to the film plane, and corrects the
distortion commonly known as converging verticals. Other
movements can be used to correct or create distortions to provide
a dramatic effect. Medium format or 35mm cameras can be used,
however, the smaller negatives and lack of control outweighs the
size and cost benefits of these formats. Shift lenses are
available for these formats although they only produce a limited
amount of movement and tend to be very expensive.
Due to limitations caused by room size or the space between
buildings, wide-angle lenses are typically used in order to
capture as large an area as possible on film. Wide-angle lenses
have a wider angle of view, greater depth of field for a given
aperture and are typically faster, i.e. have a larger aperture.
Their drawback or limitation is the distortion that can occur at
the edges (fish-eye effect) causing the curving of lines and an
exaggerated sense of depth. These problems increase in magnitude
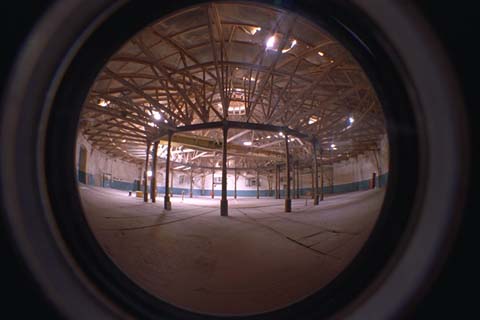
as the focal length of the lens reduces. The fish-eye effect can
be reduced or avoided by using aspherically corrected lenses and
by avoiding vertical edges at the edges of the frame. The fish-eye
effect can be exploited however to give an interesting viewpoint
as in figure 6.
A lot of architectural detail is above eye level and this
causes a problem for the photographer. To get a frame filling
shot with a wide-angle or standard lens, you have to be very
close and square on to the subject which is often not practical.
By standing further back and using a zoom or tele-photo lens, the
detail can be made to fill the frame and distortions caused by
the viewing angle minimised. This is the main use for these
lenses in architectural photography as the narrow field of view
and shallow depth of field makes them impractical for general use.
Using a tripod is essential as it removes the risk of camera
shake and leaves the hands free to adjust the camera and the set.
Filters have an important role to play, especially when
photographing indoors with artificial lighting. Tungsten lamps
give a brown cast to the images and fluorescent lighting is
typically green although it can vary. Applying a colour
correction filter neutralises the effect (blue for tungsten and
red for fluorescent) and is essential when using slide film that
is not tungsten balanced.
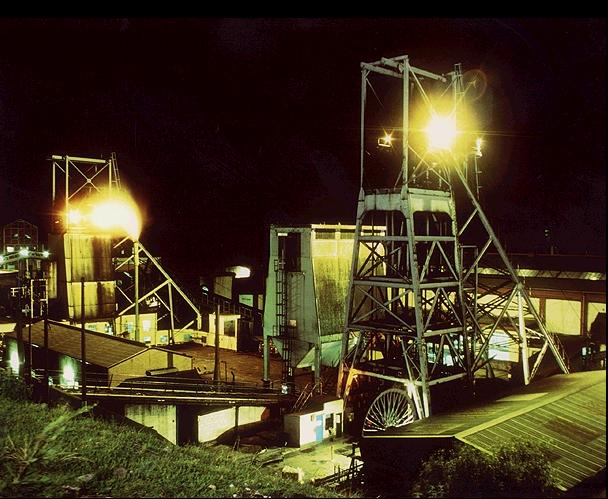 Lighting
building interiors and exteriors is extremely complicated. The
exterior shots are normally taken in daylight, however, there
will be a right time of year and hour of the day when the sun is
in the best position to bring out the texture and detail in the
building. A careful study of the building and the path of the sun
will identify the best time to photograph it. Many buildings now
have flood lighting installed making shooting in the evening
feasible. The best time to do this kind of shot is sunset or dusk
when there is still some colour in the sky and some ambient light
which prevents the background from going black and giving some
detail in the shadows. "Painting with Light" is a
technique used when there is no flood lighting available. The
camera is set for a long exposure time (5 to 10 minutes) and once
the shutter is opened, the photographer goes round the building
firing a flash gun at all the areas of the building that will
appear in the shot.
Lighting
building interiors and exteriors is extremely complicated. The
exterior shots are normally taken in daylight, however, there
will be a right time of year and hour of the day when the sun is
in the best position to bring out the texture and detail in the
building. A careful study of the building and the path of the sun
will identify the best time to photograph it. Many buildings now
have flood lighting installed making shooting in the evening
feasible. The best time to do this kind of shot is sunset or dusk
when there is still some colour in the sky and some ambient light
which prevents the background from going black and giving some
detail in the shadows. "Painting with Light" is a
technique used when there is no flood lighting available. The
camera is set for a long exposure time (5 to 10 minutes) and once
the shutter is opened, the photographer goes round the building
firing a flash gun at all the areas of the building that will
appear in the shot.
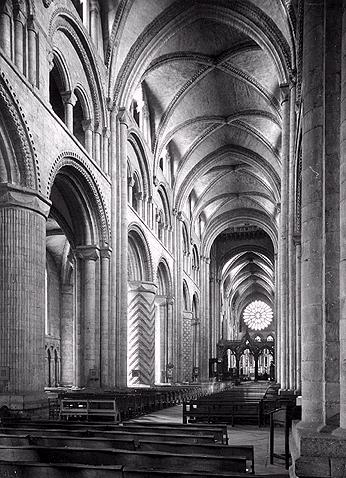 The interiors of
buildings can be as awkward as the exteriors because the
illumination is not designed for film. Bright sunlight streaming
through windows and dark murky corners creates a large amount of
contrast which film cannot cope with easily. Clever use of
reflectors and fill in flash are generally adequate in small
rooms but larger areas may need a complex arrangement of studio
flash equipment to ensure fairly even lighting throughout. Bright
sunlight is a problem that can be overcome by waiting for a
cloudy day or covering the windows with tracing paper to cut down
the light. Care should be taken with the light levels as, if they
are too low, the effective resolution of the film will decrease
and the final image will be grainy with low contrast. If large
amounts of contrast cannot be avoided, for example in churches,
use negative film which has a larger dynamic range and expose the
film for the mid range light level. Bracketing either side of
this value will ensure that you have a range of prints at
different exposures, which can be assessed later to find the
optimum.
The interiors of
buildings can be as awkward as the exteriors because the
illumination is not designed for film. Bright sunlight streaming
through windows and dark murky corners creates a large amount of
contrast which film cannot cope with easily. Clever use of
reflectors and fill in flash are generally adequate in small
rooms but larger areas may need a complex arrangement of studio
flash equipment to ensure fairly even lighting throughout. Bright
sunlight is a problem that can be overcome by waiting for a
cloudy day or covering the windows with tracing paper to cut down
the light. Care should be taken with the light levels as, if they
are too low, the effective resolution of the film will decrease
and the final image will be grainy with low contrast. If large
amounts of contrast cannot be avoided, for example in churches,
use negative film which has a larger dynamic range and expose the
film for the mid range light level. Bracketing either side of
this value will ensure that you have a range of prints at
different exposures, which can be assessed later to find the
optimum.
The choice of film will depend very much on the final use of
the images and the effect that is required. Faster film will work
in lower light conditions but the results are grainier than slow
film. The client may require slide film, however, care must be
taken to ensure colour casts caused by artificial lighting are
avoided. There is also less exposure latitude, which means that
either the metering must be very accurate or bracketing used. The
prints from colour negative film, however, can be corrected for
colour casts and some exposure problems. The bigger technical
cameras use sheet film, which is very expensive, compared to 35mm.
Sheet film has to be pre-loaded in a dark room, into light tight
containers or slides, which mount on the back of the camera. To
save cost and time, a Polaroid instant film is often used to
gauge the exposure settings before taking the final image on
proper film. Colour film tends to produce warm images while black
and white is better at picking out detail and textures.
Lithographic, and other high contrast films, can be used where
the capture of fine detail is important. The choice of film is as
important as the choice of lenses or camera position so great
care must be taken.
Architectural photography has come a long way over the last
century as lens and film technology has developed. There is now a
much wider range of materials and camera hardware available while
lighting equipment has become smaller and more powerful. The
skill of the architectural photographer, therefore, lies in his
ability to put all the technical factors like film, camera and
lighting together to realise both his own, and the clients
previsualised concepts.
Appendices
Appendix A - Architecture of Kingston Portfolio
Appendix B - Buildings & Architecture Portfolio
Image Copyright
Figure 1 – House Advert © unknown
Figure 2 – House Advert © Country Life
Figure 3 – Millennium Dome © unknown
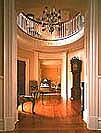
Figure 4 – House Interior © J Blunt
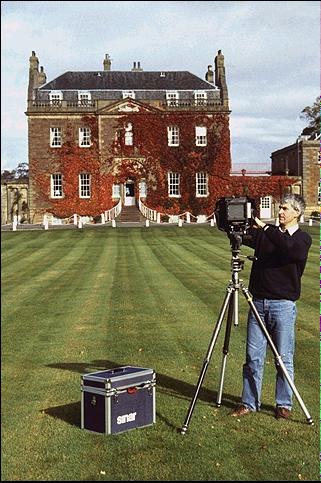
Figure 5 – RCHME Photographer © RCHME
Figure 6 - Carriage Shed © Images of England, RCHME
Figure 7 – Taff Merthyr Colliery © RCHME
Figure 8 – Durham Cathedral © RCHME
Bibliography
Photographing Historic Buildings – Terry Buchanan, second impression 1984, HMSO London |
|
How to Photograph Buildings and Interiors – Gerry Kopelow, 1998, Princeton Architectural Press Inc, Canada
| |
Monuments on Record – Interactive CDROM, RCHME, 1998 |
|