The phrase "Close-Up" in photography is an ambiguous term used as to describe a wide range of images where the subject fills the frame and has been taken at close range. More accurately, the impression of the subject on the negative is smaller than life size but fills the frame. Where the impression is the same size or larger than the subject, the genre is termed "macro". Close up shots of people, building features and other large features can be made using simple techniques and standard or telephoto lenses. Specialised equipment is only required when the subject is small or needs to be placed close to the lens. In this article, I intend to discuss some of the techniques used to take close up images of small subjects and the equipment required to accomplish this.
The simplest method of getting close to the subject is to use a supplementary lens that attaches to the filter thread on the front of the normal lens. The supplementary lens behaves like a magnifying glass and has the effect of reducing the minimum focal distance and increasing the magnification. The power of a supplemental lens is usually measured in diopters and the typical values are +1, +2 and +4. The lenses can be added together to give higher values and a stron ger effect. Supplemental lenses can be prone to distortion at the edges of the frame so care must be taken when purchasing and using these lenses. The graph in figure 1 shows how the focal distance is reduced as more powerful supplemental lens are added . The actual figures came from test results using a Canon 28-80 zoom lens and a +4 and +8 supplemental lens. The values are specific to this lens, however the trend, can be applied to all lenses (minimum focal distance halves every 4 diopters).
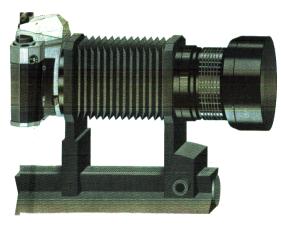
The closer the camera gets to the subject, the more the lens has to bend the light in order to focus it onto the film. As the subject gets nearer to the lens, the point at which the lens cannot bend the light enough is the minimal focal distance. Supplemental lenses pre bend the light before it gets to the lens but an alternative approach is to extend the distance between the film and the lens. Extension rings or bellows are used for this purpose and they allow the lens to be separated from the camera body. Bellows are the most flexible as they provide the photographer with a continuous range of extensions, and therefore magnification, whereas the rings come in set sizes (like the supplemental lens system).
Because no additional lenses are required when using extenders, the images tend to be better quality with none of the distortions associated with supplemental lenses. The drawback, however, is that light intensity is lost as the lens is extended from the camera requiring longer exposure times. With through the lens metering and available light photography, this is not really an issue, however, most close up images are taken using flash and so the flash meter reading must be adjusted to compensate. There is simple formula to calculate this as follows –
                    / Total Extension \ 2
Exposure X | --------------------------- |
                    \  Focal Length   /
|
E.g. an exposure time of ¼ second with a 50mm lens extended by 120mm gives an exposure time of approximately 1½ seconds. Some extension tubes give a magnification value rather than a distance and so there is a modified version of the formula as follows –
There is another issue with bellows that effects the modern camera user with electronically controlled lenses. It is impossible to pass the electrical signals required to control the lens through a bellows system and so the aperture will be stuck wide open. With close up photography of this nature, depth of field is very important and a small aperture is typically used to achieve this. It is therefore crucial that the aperture value can be set manually when using a bellows system. Extensions tubes are available for electronic cameras however they tend to be more expensive than the manual equivalents.
 The final method used to take close up
images is to reverse the lens. This technique exploits the
asymmetric design of the lens. The rear element of a lens is
designed to operate at close distances to a subject (normally the
film). Reversing the lens is not easily achieved with modern
electronic cameras, as the electrical contacts have to be relayed
from the camera to the lens and there are very few adapters
available to do this. An alternative method to this is to reverse
a lens and attach it like a supplemental lens to the front of a
normal lens. The magnification and optical quality will be far
superior to a supplemental lens system while retaining control of
the main lens.
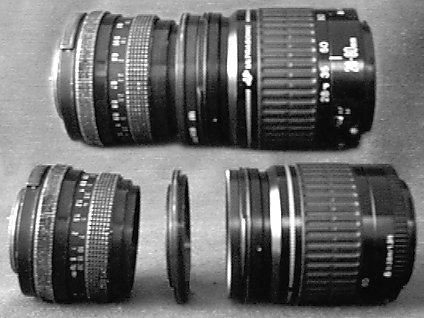
The final method used to take close up
images is to reverse the lens. This technique exploits the
asymmetric design of the lens. The rear element of a lens is
designed to operate at close distances to a subject (normally the
film). Reversing the lens is not easily achieved with modern
electronic cameras, as the electrical contacts have to be relayed
from the camera to the lens and there are very few adapters
available to do this. An alternative method to this is to reverse
a lens and attach it like a supplemental lens to the front of a
normal lens. The magnification and optical quality will be far
superior to a supplemental lens system while retaining control of
the main lens.
Many zoom lenses have a macro setting which would imply that they produce a life size image on the negative however this is very rarely the case and quite often they only produce life size images on 6x4 prints. What they do give however is the ability to move further away from the subject being photographed while retaining a high level of magnification.
As already mentioned, depth of field is very important when working on close up shots. The depth of field tends to be very small when working close to the subject even with small apertures. For example, using a 50mm lens at f16 and a subject distance of 10cms gives a depth of field of approximately 0.2mm. Focusing is therefore very critical and the slightest touch or knock can defocus or alter the viewpoint especially when using tele-photo lenses. The camera should therefore be mounted on a sturdy tripod and a cable release used to fire the shutter. When focusing the camera, set the focus adjustment of the lens to the mid point and move the whole camera assembly until the image is in focus. Fine adjustments can then be made using the focus control in the normal way. The depth of field can be calculated using a complex equation, which is detailed in appendix A however figure 4 shows a graph of how front and rear focus points alter with subject distance for a 50m lens set at f16.
When working at or near macro levels of magnification, the optical path becomes symmetrical and we can exploit a much simpler formula for calculating Depth of Focus to give an indication of the Depth of Field. The formula is as follows –
Depth of Focus = Aperture X Circle of Confusion
When working with film, the circle of confusion is defined as the grain size or the inverse of the film resolution (measured in lines/mm) and will have an average value of 0.01mm. Therefore when operating at f16 with an average film, there is 0.16mm available in front of and behind the focal point.
 Lighting can be complicated and depends
primarily on the subject to be photographed. There are three ways
of lighting the subject, the least successful of which is
daylight or ambient light. Ambient light is not easily controlled
and does not have the same intensity as a specially lit set. When
working with close up lens attachments, the camera and lens will
normally cast a shadow over the subject which increases the
exposure and makes the subject look flat. Side lighting with
tungsten or flash will show the detail and texture of the surface
as well as generally raising the light levels. Tungsten lighting
is useful as the camera can do metering and the full effect can
be seen thought the viewfinder. Any colour casts can be removed
by using a filter or at the printing stage with negative film.
The drawback is the heat that is produced can damage the set or
worse still, burn or cook any vegetation or wildlife. Flash
lighting with modelling lamps is the best solution when using
slide film or subjects that are sensitive to heat however setting
up and metering is a bit trickier. An adequate lighting system
can be created using a single lamp (flash or tungsten) shone from
the side with reflectors at the back and opposite side to provide
fill in light and preventing dark shadow areas.
Lighting can be complicated and depends
primarily on the subject to be photographed. There are three ways
of lighting the subject, the least successful of which is
daylight or ambient light. Ambient light is not easily controlled
and does not have the same intensity as a specially lit set. When
working with close up lens attachments, the camera and lens will
normally cast a shadow over the subject which increases the
exposure and makes the subject look flat. Side lighting with
tungsten or flash will show the detail and texture of the surface
as well as generally raising the light levels. Tungsten lighting
is useful as the camera can do metering and the full effect can
be seen thought the viewfinder. Any colour casts can be removed
by using a filter or at the printing stage with negative film.
The drawback is the heat that is produced can damage the set or
worse still, burn or cook any vegetation or wildlife. Flash
lighting with modelling lamps is the best solution when using
slide film or subjects that are sensitive to heat however setting
up and metering is a bit trickier. An adequate lighting system
can be created using a single lamp (flash or tungsten) shone from
the side with reflectors at the back and opposite side to provide
fill in light and preventing dark shadow areas.
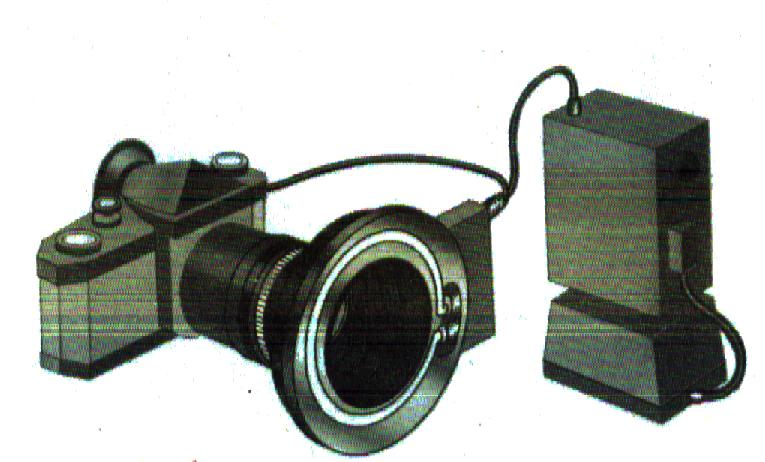
An alternative to the studio lighting is a device called the ring flash. Normal camera mounted flash guns are not effective with close up photography as the lens barrel casts a shadow on the subject. Ring flash is a circular flash tube, which fits onto the end of the lens and bathes the subject evenly in light. It is very useful for freezing moving objects and is very portable. Ring flash can also be used for other types of photography like portraiture and produces some interesting effects.
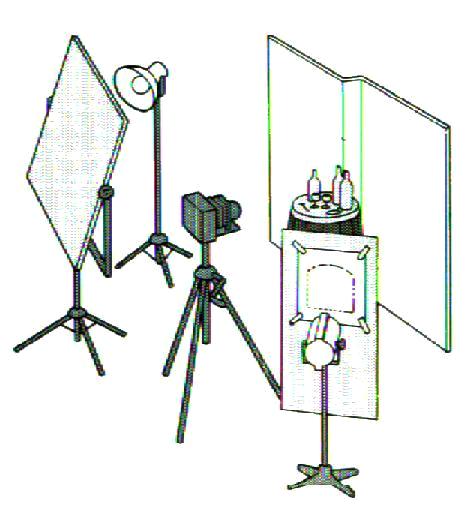
A significant amount of close up photography is undertaken in a studio environment as it is easier to control the environment (lighting, composition etc.). Sets can easily be created on a tabletop with a backdrop suspended from an adjacent wall. The lighting can be easily controlled and positioned around the set. Translucent objects like fruit can be placed on a light box or piece of frosted glass mounted above a flash unit to show their internal structure and give a white background. Another technique is to place the subject on a sheet of glass and keep this away from the background. When photographed from above, the effect is to make the objects appear like they are suspended in mid air.
These techniques are useful for inanimate objects however when photographing animals and insects a different arrangement is required. In order to prevent the animals or insects from being hurt or escaping, it is advisable to build a set in an aquarium or tank. The subject is placed in the tank just before the shoot and only once the photographer has arranged the set and taken test shots to ensure everything is as previsualised. When shooting though glass, the camera should be covered or hidden behind a black panel so that its reflection is not seen in the glass. The lights should be shone from the sides or the top. Flash units rather than tungsten must be used to protect the wildlife unless heat resistant glass is used for the aquarium.
Close up photography covers a large range of subjects from architecture to insects and the techniques used are many and varied however the main problems faced by the photographer are lack of Depth of Field and provision of adequate lighting. While there is a lot of equipment designed specifically for the purpose, good results can be achieved quite cost effectively by improvisation and a good choice of lenses.
Appendix A - Depth of Field Calculation
Appendix B - Close-Up Portfolio
Figure 1 - Graph of Focal Distance "V" Diopter Value © Bob Manekshaw
Figure 2 – Camera Bellows © Master Photography – Michael Busselle, 1979, Mitchell Beazley Publishers, London, p65
Figure 3 - Reversed lens, attachment ring & standard lens © Bob Manekshaw
Figure 4 - Depth of Field Chart for 50mm lens at f16 © Nicholas Sushskin
Figure 5 – Ring flash © Master Photography – Michael Busselle, 1979, Mitchell Beazley Publishers, London, p65
Figure 6 – Studio Setups © The Photographers Handbook 3rd Edition – John Hedgecoe, 1992, Dorling Kindersley, London, p214 & p225
Bibleography
The Photographers Handbook 3rdEdition – John Hedgecoe, 1992, Dorling Kindersley,London |
|
Master Photography – Michael Busselle,1979, Mitchell Beazley Publishers, London |
|
Lens Works – Canon, 1996, Canon Inc, Japan | |
http://www.dof.pcraft.com - Nicholas Sushkin’s Depth of Field Web Page |
EndNotes