 |
 |
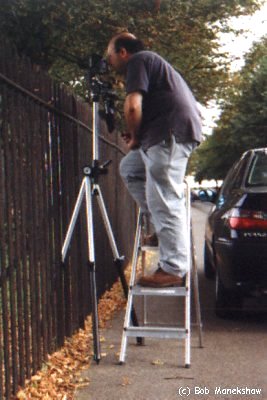
to reach the camera |
It was a hot July day and I was heading into deepest darkest Kent for an Images of England (IOE) briefing session. I had applied to become a photographer on the project what seemed like an age ago when the first press releases were issued in February and now here I was pulling up in front of a little village hall and on the team. The Images of England project is an ambitious adventure to photograph all the listed buildings and monuments in England by the National Monument Record. It will take three years for the volunteers photographers to record the 300,000 items and the final images will be made available to the public via the internet.
We got down to business promptly and had an interesting talk from the IOE team who had courageously gone on the streets themselves to get some first hand experience of what the job required. We were told about the pitfalls and traps of photographing buildings, but, much worse than the avoidance of traffic or the kindly souls offering refreshment was the take only one shot of each building. This incongruous little phrase struck fear and in trepidation at the heart of every photographer. Photographers burn film at every opportunity - what do they mean only one shot!! In fact, it makes perfect sense when you think about the project as a whole. There are approximately 300,000 items on the register which have to be photographed. If we take two images of every building then the film and print costs will double immediately. A selection team will also have to be employed to select the best image costing more and adding an unnecessary time delay. Simple solutions are always the best and so the IOE team gave the photographers the ultimate challenge - study the site carefully and choose the angle that gets the most detail of the building.
Wow what a brief! I have complete control over the shot I take but what buildings have I been given? At the end of the briefing, we were given a folder which contained amongst other things our schedule of work. I have to say that I could not wait until I got home and had to stop en route to have a nose at my goodie bag and the treasures therein. I was glad I was sitting down as I read through my schedule with growing incredulity. Names like Ham House and Hampton Court kept appearing and my mind raced at the possibilities and fun I was going to have. Its no use dreaming good pictures however and once the euphoria had passed, I started to think about the logistics of the whole exercise. It may sound really obvious but the key to success is always planning. My first thought was to reccy some of the areas as the photography season was some way off. However I found it quite frustrating finding the buildings and not being able to take an image and more importantly, it didn't really save much time. In the end, I took the simple street listing we were given and looked up each address on an AtoZ of the area (use one with OS co ordinates as there are many duplicate or incorrect street names but I have found the grid reference to always be correct). Having located all the targets on the map, I was able to group them into districts that could then be managed more simply. My initial pleasure at having Ham House and. Hampton Court was short lived because all National Trust, English Heritage and Historic Palaces were not to be photographed in the first season. This did leave me however with about 120 other buildings and monuments to photograph.
First thing on the shopping list was a good sturdy tripod. This is important because although we were supplied with ISO400 film, poor lighting or small apertures still makes camera shake an issue. More importantly however, you look like you are serious about the task in hand and people are less likely to question your motives and to do as you ask. Ladders are another very useful and important accessory. At the briefing session, we had an National Monument Record photographer tell us about some of the problems and challenges in this kind of photography. He discussed some interesting techniques including one for getting more height (and this is not recommended especially if you are a big lump like me) by standing on the roof of you car. I opted for a three step aluminum ladder which was light and allowed me to use the tripod at its fullest height or to hand hold the camera to get a better perspective and minimise parallax distortion.
|
|
to reach the camera |
In fact my total kit bag for the project worked out as follows -
I will have to say right here and now that I was spoilt. I had plenty of friends who wanted to be assistants and this was even before they heard the story of the lady in the window (more of that later). The role of the assistant was key to the smooth running of the operation as a whole. Apart from helping to lug all the gear around the assistants also kept a record of each shot and help to locate each building. The only drawback was the frequent stops for tea and cake but this is a small price to pay.
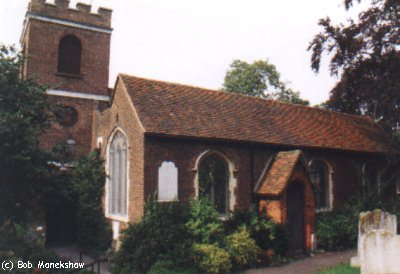
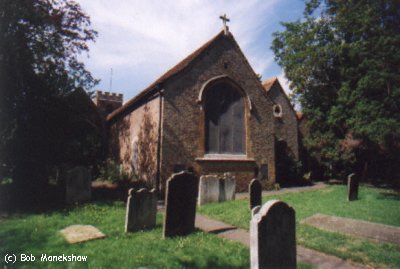
So now we had a team, equipment and a schedule, there was nothing left but to take those photos. Most of the buildings were easy to find as the address details were quite accurate. There were a few which took some hunting down and needed careful analysis of the detailed descriptions which were supplied for each building. These descriptions are not easy to read as they are basically lists of architectural terms that describe the features of the building and effectively, the reason why it is listed. My assistants would read the entry aloud as we walked around the building. Once we had verified that we had found the right property we needed to find the best shot. The trick was to look for an angle where you could capture as many details from the description on the final image as possible while keeping the building in context. This would typically be a shot off center in order to get two faces of the building to give a sense of all three dimensions. This sounds easier than it really was some times especially when you have features on opposite sides of a building and you have to choose which is the most important. The church of st Mary with St Alban is a good example of this as the pretty shot (fig 3) makes the building look quite small and quaint however a wander round the churchyard reveals that this building is actually made from 4 parts and this was the shot that was actually taken for the record.
 |
 |
|
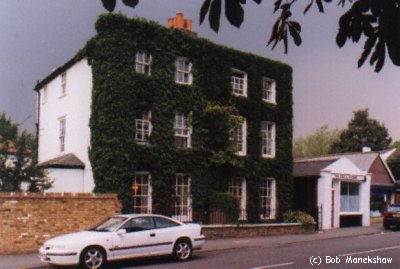
Most listed buildings are actually private residences in towns and villages and not country mansions in acres of parkland and this creates many challenges for the photographer. The first problem is trying to get away from your subject. These buildings are tall and so to avoid parallax errors, the photographer needs to move away the subject. However, this typically means standing in the middle of a busy road at best or in the back garden of the building across the road at worst. Shorter focal length lenses help bring the photographer nearer the subject. However, to avoid the converging vertical lines, the image has to be taken from as high a vantage point as possible and hence the ladder. The best solution is a short focal length shift lens but this would be well beyond the means of most of the photographers on the project.
Being private residences, many of them have high walls or shrubbery guarding them from the outside world. Our brief is to take photographs from public land e.g. roads, footpaths, parks etc where ever possible. There are times however when you just have to enter the property in order to take the shot. Permission must always be sought from the owner to do this so armed with a set of leaflets and my ID badge, I would knock on the door and explain what we were doing. Nine times out of ten, people were happy to let me continue once they understood the problem as they wanted their property to look its best. We had a few people who wanted their privacy, which we respected even if they asked us not to take the shot from the pavement. The point here is that while we can photograph anything we want from public land, we did not want to alienate or upset the residents. There is always a chance that they may change their minds later if you show reason and due care.
|
The weather can be a problem to as can be seen in image 5. We hadn't really noticed the sky getting darker and luckily this was the last shot of the day. We had just got ourselves strapped into the car when the heavens opened and we had one of the worst thunderstorms of 1999. The hailstones made so much noise as they hit the car you couldn't hear a thing and all the roads on our way home were awash with water. Mind you sunshine can be a problem to and we had to go back to a number of properties at different times of the day in order to get the light right. |
Even while taking pictures from public places, people would stop and chat which can be very distracting. The owners would also come out quite often talk to you and again most were quite friendly. I was taking a shot of a large town house from across the road and through a large gate in the perimeter wall that luckily was open. I got the shot just before the gate closed (electric of course) and a small side door opened a few minutes later to reveal an elderly gentleman in a dressing gown. We had a good chat about the project and equipment while my assistants huddled in the cold with the gear. Conversely some people are not very communicative at all which can make things very difficult. I was taking a picture of another town house on a quiet lane when one of the residents came out of the front door and stood at the gate. I went over to explain the project and he never said a word. I handed him the leaflets and he just stared blankly at me before going back in and pulling the wooden shutters to on his flat.
One final word of warning is to check the image for every detail before you press the shutter button. You will be surprised how many bits of litter or people or cars can stray into a scene just when you want to take a picture. It doesn't stop there however as even the residents in the houses can conspire against you. I had just lined up a shot of a lovely house from across a busy road and I was looking through the viewfinder for a gap in the traffic when I noticed a movement in one of the upper windows. When I looked there was an attractive girl in the window which was not quite what we wanted for an IOE shot. What made it worse was that she obviously going about her morning routine and kept going past the window. As it was the last house in the row we had no choice but to wait for her to finish dressing - what a hardship. Tempting as it was to take a shot as evidence for this sordid tale, honour and respect for peoples privacy won the day and the final image was sans girlie.
We had many adventures over the three-month season in 1999 and saw a wide variety of buildings and monuments. It taught me a lot about organising a shoot on this large scale, architecture and the hidden secrets on my doorstep. We had very good weather on the whole which helped make the whole project go very smoothly and I had some fantastic assistants which made the whole project more social and speeded things up. The worst part of the project was the waiting to get our first prints back from the processors but the relief was immense when I found that virtually all the shots were useable. I enjoyed the 1999 seasons and would recommend to anyone who has an interest in photography and architecture to take part in the 2000 & 2001 seasons.
Appendix A - Portfolio - Images of England - A Photographers Experience
Appendix B - Images of England Web Page
Appendix C - Architectural Photography Article
Appendix D - Shift Lens Article